[Last updated 4th Oct 2020]
Possum TV Cameras
There are many types of security camera available these days, but there are certain special requirements for a possum (or other wildlife) box camera which you need to consider:
- The camera needs to be short and stubby (match box sized) in
order to fit into the box. Anything bigger will require the box to be
modified to make room for it.
- It needs to be able to work in complete darkness. Possum boxes
are intentionally dark places, and, although possums generally occupy
boxes during the daytime when a significant amount of sunlight leaks
in, some of the most interesting footage can occur when a possum
visits during the night. To achieve this you need to use a camera
with an IR (infra-red) illuminator.
- Some cameras incorporate IR-cut filters. This used to be
exception but now they are commonly fitted even to low-cost cameras.
These improve the colour rending under normal lighting conditions,
but prevent the camera from being used with an IR illuminator and are
unsuitable for use in a possum box. Usually a camera won't say
whether it has an IR-cut filter, but you can assume that any camera
which comes with an IR illuminator built-in, or which is labelled
"day-night" or NOIR (i.e. No IR filter), will be OK.
- It is possible to remove the IR filter from a camera. The filter
consists of a small square of glass, usually with a slightly blue
tint, which is glued to either the image sensor or the rear of the
lens assembly. You will usually have to break the filter to get it
off. Filters attached to the lens assembly are relatively easy to
remove. Filters attached to the image sensor are usually difficult to
remove and there is about a 50% chance of wrecking the sensor when
doing so.
- Any IR illuminator should be of the type that emits
completely invisible light. Many of them emit a dull red glow. This
is discussed in more detail below.
- The camera needs a relatively wide lens angle; ideally around
90° diagonally. The lens angle is a function of image sensor size
and lens focal length; the larger the sensor and shorter the focal
length, the wider the lens angle. For a 1/3" sensor a 3.6 mm
focal length is generally usable. However, cheap cameras sold as
having 1/3" sensors may in fact be fitted with a 1/4" or
smaller sensor which will require a 2.8 mm or shorter lens. Nearly
all small cameras use a lens with an M12x0.5 mm thread, so you can
swap and replace lenses fairly easily.
- Possums occasionally bite, or get into boxing matches with,
cameras. Geckos sit on them. Ants try to build nests inside them.
They generally have to put up with a bit of abuse. This doesn't mean
the camera has to be explosion-proof, but it should be well sealed
and have a mounting that can't easily be knocked out of position. A
metal cased camera is preferred to a plastic cased one, although this
is not essential. Sometimes plastic cased camera pick up electrical
interference when possums get close to them.
- Some cameras have a microphone built-in and this is
theoretically a good thing to have. Possums make noises at times
and a soundtrack adds a lot to a movie. Unfortunately, even though
many of our cameras have microphones, we can't currently record audio
due to software limitations, but nevertheless I'd still recommend
microphones if available. Generally cameras with built-in microphones
cost only a fraction more than those with. These days, however,
microphones are becomes less easily available.
- When I first set up this system in 2005, it used to be that you
had the choice between cameras with CMOS and CCD sensors and I
recommended using CCD for reasons which are not longer really valid.
In fact for this application, the image quality is limited primarily
by optical considerations (lenses are generally optimised for use
with visible light and don't focus as well with infra-red, and also
there are issues with depth of field caused by having the camera so
close to the subject), with a secondary limit caused by having to
reduce the image resolution to conserve storage space and/or
bandwidth. The image sensor itself is one of the stronger links in
the chain, and paying extra for a higher quality sensor is generally
not worth it. Pretty much any available sensor will be good enough.
One thing I would also recommend is to be sceptical of advice from people who haven't actually set up a nestbox camera, even if they are otherwise knowledgeable. I once talked to a professional camera installer who worked for OzSpy, and he said that cameras like the ones we have used are no good because moisture condenses inside them, causing them to fail after a few months. While I would be willing to accept that this might be the case for cameras which are left turned off for long periods, the fact is that possum box cameras are kept running continuously and the heat they generate prevents condensation from occurring. The oldest cameras in use have run in excess of 10 years and never has a camera failed electrically.
Also be sceptical of specifications given for cameras in eBay. Generally they will quote stuff like a "1/3" Sony 960H Exview HAD CCD II" sensor, when in fact they have an inferior sensor that is more 1/5". Such an inferior sensor will still generally be good enough for a possum box, but the field of view will be less than expected for a given lens size. Also, power consumption figures are often wrong, but interestingly the quoted figures are more often than not higher than the actual, meaning there is probably no intent to deceive, but instead someone has been copy/pasting the specs of some similar camera.
We have not yet located the ideal camera, but the following types have been used so far.
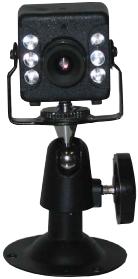 Swann Day-and-Night
The first two boxes installed in 2005 had this type of camera. The cameras have now been replaced by different cameras and this type is no longer available
This was a very easy camera to use; there is nothing to configure and no extra hardware needed (except that you'll probably need an extension cable, but Swann sell a matching extension cable as well). For the record, this camera had the following specs:
- D x W x H = 35 x 30 x 32 mm (excluding mounting bracket)
- 1/3" Colour CMOS sensor (switches to B&W in low light)
- Has a built-in microphone
- Built-in IR illuminator, which allows the camera to work down to 0 Lux
- Auto gain control, auto shutter speed and auto white balance
- 52° lens angle (8.7 mm lens?)
- Supplied with 20 m of cable and plug-pack power supply.
- 0.5 W power consumption at 9 V (56 mA)
- Plastic case
If you can still find one of these cameras anywhere, it would be an acceptable entry-level camera. The image quality isn't great and the narrow lens angle means you have to aim it carefully for the best picture, but otherwise it does the job and it's easy to work with.
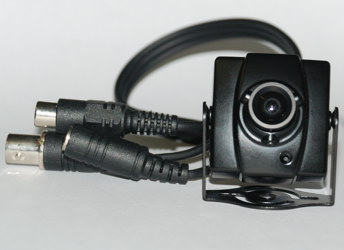 Jaycar/Electus
QC3474
Jaycar/Electus
QC3474

This was the new "standard" camera that was installed in boxes 3 to 7. Unfortunately this type is also now no longer available.
This was a relatively low cost camera (although now overtaken by cheap eBay cameras) and it did pretty much everything that's needed of it. Disadvantages are that you need to build a separate infra-red illuminator (described below) and the mounting screws don't hold it very securely, so it's vulnerable to being knocked out of alignment by inquisitive possums. The specs of this camera are as follows:
- D x W x H = 30 x 36 x 38 mm (excluding mounting bracket)
- 1/3" B&W CCD sensor
- Has a built-in microphone
- Works down to 0.1 Lux, but will work in total darkness with an external illuminator.
- Auto gain control, auto shutter speed
- 90° lens angle (3.6 mm lens?)
- Supplied with around 300 mm of cable, with BNC, RCA and DC connectors.
- 1.32 W power consumption at 12 V (110 mA)
- Die-cast metal case
The short stub of cable supplied with the camera has a couple of advantages. Firstly it allows you to disconnect the camera easily if you're taking the box out of the tree. Secondly, it allows you to hook in a hand-held video monitor, so you can re-align the camera more easily if it gets knocked out of position.
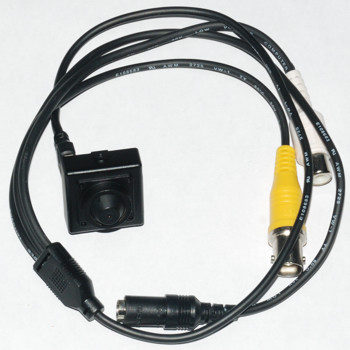 Jaycar QC3473
"pinhole" camera
Jaycar QC3473
"pinhole" camera

This type of camera was used in Box 2 from October 2013 to July 2020. It was not a success and this type is now no longer used in any boxes.
This camera is very similar to the QC3474. The main differences being that it's smaller and has a "pinhole" lens. It's not actually a true pinhole camera, but merely has a very small lens. The specs are:
- D x W x H = 19 x 25 x 25 mm (excluding mounting bracket)
- 1/3" B&W CCD sensor
- Has a built-in microphone
- Works down to 0.05 Lux, but will work in total darkness with an external illuminator.
- Auto shutter speed
- 3.6 mm lens
- Supplied with around 300 mm of cable, with BNC, RCA and DC connectors.
- 1.2 W power consumption at 12 V
- Die-cast metal case
The reason why this camera was chosen for Box 2 was that this was a smaller box than the others (it was intended for ringtails) and possums often get very close to camera. This means that the camera needs a very large depth of field to keep the possum in focus. Supposedly, the smaller the aperture of a camera lens, the greater the depth of field, so I had hoped that the particularly tiny lens on this camera would be ideal. In practice, however, the camera was overall worse.
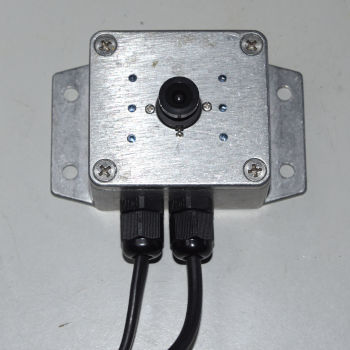 Custom camera based on Bay Drone camera

After the "standard" cameras I had been getting from Jaycar had become unavailable, I had decided to buy cheap eBay drone camera boards and construct my own cameras from them. This was a lot more work than just buying a camera off the shelf, but has the advantages of being cheaper and allowing me to customise the camera better.
This type of camera is currently used in boxes 1 and 2. I may vary the design somewhat for future cameras.
- D x W x H = 49 x 64 x 58 mm (excluding mounting flanges)
- 1/4-1/5" Colour CCD sensor
- No microphone
- Auto shutter speed
- 2.8 mm lens
- Fitted with approx 300 mm of coax cable with BNC and power cable.
- Approx 1 W power consumption at 12 V (80 mA, including IR illuminator)
- Die-cast metal case
To build this camera it was necessary to remove the IR filter from a drone camera and mount it in a die-cast metal enclosure. The IR illuminator has been built into this enclosure and this required making a custom PCB (printed circuit board) for the electronics. More detail on the construction of this camera is on the blog .
Infra-red Illuminator
An IR illuminator can be made from a cluster of IR LEDs. There are two main types of IR LED available; those with a "short" wavelength of around 850 nm, which emit a dull red glow, and those with a "long" wavelength of around 940 nm, which are invisible to the naked eye. Unfortunately, cameras are 3-4 times more sensitive to the former type, and therefore illuminators designed for use with (or incorporated into) day-night cameras generally use this type of LED. The Swann day-night camera was an exception to this rule.
For a possum box, you need the "long" wavelength type; you don't want a red glow that might scare away possums and it doesn't matter that it's less powerful since you only have to illuminate the inside of a small box rather than a room or yard.
I have been unable to find a commercially made IR illuminator which is suitable for a possum box. All of them are far too powerful, and virtually all use the "short" wavelength LEDs as well. Fortunately, it's quite easy to make an IR illuminator. The simplest way is to connect a string of around six IR LEDs in series with an appropriately sized resistor, however I decided to use an LM317 voltage regulator as a constant current source to ensure the LEDs would always run at the selected current, regardless of supply voltage variations.
This is the schematic of the circuit I used.
eBay is probably the first place to look for components. It's usually very good; you will rarely get totally ripped off, but a) don't assume you will always get the best price from eBay and b) stuff that's unusually cheap will usually have some catch to it; if you can identify what this catch is, and can deal with it, you can get some great bargains, if not, you can be saddled with something that's unusable.
If you're in Australia and need something fast Jaycar will probably be your first choice. You can also try looking at Radio Spares or Element 14 (formerly Farnell). These two used to be notoriously expensive and will still rip you off majorly for some items, but often you can find stuff cheaper than eBay and they'll deliver super fast.
Cabling
Most of the difficulties and annoyances related to installing a possum box camera are caused by the need to bring a cable back from the camera. Cables run outside get subject to so much wear and tear that even if they are rated for exterior use (e.g. UV stabilised etc.), it's still better to run them inside electrical conduit.
I ran virtually all of the exterior cables inside 25 mm PVC electrical conduit. I initially used 20 mm conduit, but this is really too small to push the cables through, especially if you've already terminated them (BNC connectors are really fat). If you are running cabling to more than a couple of cameras, you need to go up to 32 mm conduit. I'd also recommend you limit the amount of flexible conduit that you use; the ridges on this stuff make it really difficult to get cables through and the longer the section, the worse it is.
You'll find that in addition to conduit, you'll also require a surprising quantity of miscellaneous fittings (elbows, saddles, junction boxes etc.) to make a good installation, but it's worth the time to do it properly. It's usually best to buy this sort of stuff from your local electrical supplier (e.g. Ideal Electrical or Haymans, if you're in Australia) rather than a normal hardware store because they've generally got lower prices and a better range. A few quick comments:
- When using saddles to attach conduit to a tree, use plastic saddles and not metal. The metal ones have only thin zinc plating on them and rust quickly. Also, use screws and not nails - even if the saddles come with nails attached, it's best to discard the nails and substitute screws. I initially used nails on box 1 and the tree pushed them out after a few months.
- Pulling cables through conduit is a difficult art. I generally start by pulling builder's string through the conduit and then using this to pull through the cables. Tying a steel nut to the end of the string allows it to the dropped by gravity through vertical sections of conduit, and it can also be pulled by use of a powerful magnet on the outside. Tying a piece of rag to the string and blowing/sucking this through the conduit with a vacuum cleaner can also be done.
- For extra strength and/or water resistance, I often use plumbers PVC adhesive to glue joins in the conduit which are facing a direction where they may admit water, or which need to support weight. This is optional and I'm not sure if I really recommend it; electrical conduit is not usually glued, and gluing stuff can get you in trouble if you need to make changes later. On the other hand, it can be annoying to find that a join has popped open and the conduit is full of foul-smalling water.
- If you conduit has U-shaped sections in which could accumulate water, it is often a good idea to drill a weep hole in the lowest section of the pipe to allow water to drain out. Too small a hole can block up; I normally use 3 mm.
Don't be shy about purchasing stuff from an electrical supplier if you're not a registered electrician. There are no laws that say they can't sell this stuff to members of the public, and you'll generally find them to be helpful and co-operative.
You can buy pre-made cables with all the right connectors already fitted. These are OK to start with (I used them on the first two cameras) and handy to have available for temporary hookups, but with a larger installation, it's best to cut your own cables to size and terminate them yourself. I have generally used 0.5 mm2 speaker cable for power, RG-59 coax for the video and cheap shielded audio cable for the audio. You can also get a cable intended for CCTV cameras, which consists of both RG-59 coax and figure-8 power cable in the same cable. This makes installation much easier and is recommended if you can get it. Power cables are terminated by either soldering on an appropriate connector or just putting the wires directly into terminals, however the coax is best terminated with a crimp-on BNC connector, and this means purchasing the correctly sized crimping tool. There are screw-on BNC connectors which don't require crimping, but these are not as secure.
It is possible to use RG-6 coax in place of RG-59. There are bitter arguments about the merits of each type on the web; generally, both will work, but RG-59 is usually both cheaper and somewhat more suited to video cameras.